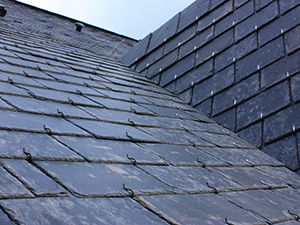
How Are Slate Tile Roofs Installed? A Slate Tile Roofing Contractor in Chicago, Illinois Explains
When it comes to roofing materials, slate tile is often regarded as one of the most durable and aesthetically pleasing options available. Slate tile roofs have been used for centuries due to their strength, longevity, and natural beauty.
If you are considering installing a slate tile roof, it is important to understand the installation process to ensure that your investment is properly executed. Without further ado, this slate tile roofing contractor in Chicago, Illinois is going to provide an overview of the process below.
First: What are the advantages of slate tile roofs?
Before diving into the installation process, let’s first explore the advantages of choosing slate tile as your roofing material. One of the primary benefits of slate tile roofs is their exceptional durability. Unlike other roofing materials, such as asphalt shingles, slate tiles can last for up to a century or more with proper maintenance. This longevity not only saves you money in the long run, but it also reduces the environmental impact of constantly replacing your roof.
In addition to durability, slate tile roofs offer a timeless and elegant aesthetic. Available in a range of colors and textures, slate tiles can complement any architectural style. Whether you prefer a traditional or contemporary look, slate tiles can enhance the overall appearance of your home. Furthermore, slate is a natural material, making it a sustainable choice for environmentally conscious homeowners.
Understanding the installation process of slate tile roofs
Installing a slate tile roof requires precision and expertise. The process begins with careful planning and preparation to ensure a successful installation. From preparing the roof to securing the tiles, each step is crucial in achieving a durable and long-lasting slate tile roof.
Preparing the roof for slate tile installation
Before the installation, your slate tile roofing contractor in Chicago, Illinois will inspect the structure for any existing damage or weaknesses. Any repairs or reinforcements should be addressed prior to the installation to prevent further issues down the line. Additionally, the roof should be cleaned and free of debris to provide a smooth and even surface for the slate tiles.
Once the roof is prepared, a layer of underlayment is applied to provide an extra layer of protection against moisture and to improve the overall insulation of the roof. This underlayment acts as a barrier between the roof deck and the slate tiles, preventing water infiltration and reducing the risk of leaks.
Installing the underlayment for slate tile roofs
The underlayment for slate tile roofs is typically made of a synthetic material, such as high-density polyethylene (HDPE) or rubberized asphalt. These materials offer excellent durability and resistance to weathering. The underlayment is laid down in overlapping strips, starting from the eaves and working upwards towards the ridge. This ensures that water will be directed away from the roof and towards the gutters.
It is important to note that the underlayment should be properly secured to the roof deck using nails or staples. This will prevent any shifting or movement during the installation process and ensure a stable foundation for the slate tiles.
Laying the slate tiles on the roof
Once the underlayment is in place, your slate tile roofing contractor in Chicago, Illinois will begin laying the tiles. They are carefully placed in a staggered pattern, starting from the bottom and working upwards. This pattern helps to distribute the weight of the tiles evenly and provides a visually appealing look.
Each slate tile is secured to the roof using copper or stainless steel nails. These materials are chosen for their durability and resistance to corrosion. The nails are driven through pre-drilled holes in the slate tiles, ensuring a secure and long-lasting attachment.
Securing the slate tiles and finishing touches
After all the slate tiles are installed, the final step is to secure them and add finishing touches. Copper or stainless steel hooks are used to hold down the bottom row of tiles, preventing them from sliding off the roof. These hooks are discreetly placed beneath the tiles, maintaining the overall appearance of the roof.
To complete the installation, any necessary flashings, such as chimney flashings or ridge flashings, are added. Flashings are essential for waterproofing the roof and preventing water from seeping into vulnerable areas. Properly installed flashings will ensure that your slate tile roof remains watertight and protected from the elements.
Looking for a Slate Tile Roofing Contractor in Chicago, Illinois?
Are you looking to have a new slate tile roof installed by the professionals? Looking to partner with the best slate tile roofing contractor in Chicago, Illinois? If so, Conrad Roofing of Illinois is the top choice. With our knowledge and expertise, we can guide you through the entire process and ensure that your slate tile roof is installed to the highest standards. Contact us today at (773) 286-6212 to schedule a free consultation.


